Transform Your Space: Floor Plan to 3D Conversion Tips
Learn expert techniques to convert floor plan to 3D visuals. Create immersive, stunning spaces that impress clients and boost sales.
Understanding a property's layout used to mean deciphering complicated 2D blueprints. This often created confusion and a disconnect between the design and what the client actually wanted. Today, floor plan to 3D conversion solves this problem. It provides a tangible, immersive experience that's changing the spatial design world. Moving from static lines on paper to interactive digital models is reshaping client expectations and influencing project outcomes. You might be interested in: How to master drawing a floor plan .
Enhanced Visualization and Communication
One of the biggest benefits of 3D visualization is how much easier it makes it to understand a space. Imagine trying to explain the flow between a kitchen and dining area using a traditional floor plan. It can be difficult! With a 3D model, clients can virtually "walk" through the space and immediately understand the layout. This clear visual communication between designers and clients minimizes misunderstandings and ensures everyone is on the same page. This also streamlines decisions, leading to faster approvals and a more efficient workflow.
The Impact on Sales and Marketing
The advantages of 3D floor plan conversion go beyond the design phase. In real estate, 3D visualizations are powerful marketing tools. Potential buyers can experience a property before it's even built, leading to quicker sales and potentially higher property values. This is especially helpful for properties sold off-plan, where visualization is key to attracting early buyers. The global 3D floor plan service market has grown substantially, driven by the demand for these impactful marketing tools. This growth is particularly strong in areas with booming real estate markets, like North America and Europe. Find more detailed statistics here: Verified Market Research - 3D Floor Plan Service Market .
Reducing Costs and Revisions
3D models are critical for reducing costly revisions. By finding potential design problems early, architects and builders can avoid expensive rework during construction. This proactive approach saves both time and money, keeping projects on budget and on schedule. Floor plan to 3D conversion is more than just a visualization tool; it's essential for efficient project management. Visualizing and addressing potential issues early contributes significantly to a project's overall success.
Choosing Your Floor Plan to 3D Arsenal: Tools That Deliver
Converting a floor plan to 3D involves more than just software. It requires selecting the right tools for your specific needs. Choosing the right tools, much like a craftsman selecting the perfect chisel, is crucial for achieving professional results. Whether you're a seasoned architect or a homeowner envisioning a remodel, the market offers a diverse range of options. This section will help you navigate these choices, focusing on software that truly delivers. Here's a resource on selecting the best blogging tools , which offers a surprisingly relevant analogy to choosing design software.
This careful selection process is crucial when starting with floor plan to 3D conversions.
Software Selection: Balancing Power and Simplicity
The best software for you depends on several factors, including your technical skills, project complexity, and budget. For beginners, user-friendly platforms like SketchUp with drag-and-drop interfaces and pre-built asset libraries are ideal. These tools often offer automated features like wall detection, simplifying the initial modeling process.
For more experienced users, advanced software like Autodesk 3ds Max or Blender with robust modeling capabilities, lighting simulation, and extensive material libraries provides greater control and flexibility. Choosing between ease of use and advanced features is a key consideration.
To help you compare options, we've put together a table outlining the key features, pricing, and ideal use cases for several popular software choices.
Introducing the "Floor Plan to 3D Software Showdown," a table designed to help you compare leading software options for converting 2D floor plans into dynamic 3D models. We evaluate features, pricing tiers, and identify who each software best suits, along with a general assessment of the learning curve.
| Software | Pricing Tier | Key Features | Best For | Learning Curve |
|---|---|---|---|---|
| SketchUp | Free, Paid | User-friendly interface, 3D Warehouse | Beginners, DIY projects | Easy |
| Blender | Free | Open-source, extensive features, animation tools | Experienced users, complex projects | Steep |
| Autodesk 3ds Max | Paid | Professional modeling, rendering, animation | Architects, designers, VFX artists | Steep |
| Sweet Home 3D | Free | Interior design focused, drag-and-drop furniture | Homeowners, interior decorators | Easy |
| Revit | Paid | BIM software, detailed architectural modeling | Architects, engineers | Steep |
This table provides a quick overview of different software options. Remember to research each one further to determine the best fit for your specific project needs.
Features That Truly Matter
Certain features significantly impact the final 3D output. Automated wall detection, for instance, can save hours of manual work. Extensive material libraries allow for realistic surface representation, while lighting simulation brings the space to life. These features aren't just extras; they're essential for professional-grade visualizations.
The infographic below visualizes data on the impact of optimized 3D conversion workflows. It compares Time Saved (%), Error Reduction (%), and Cost Savings (%) when using the right tools and strategies.
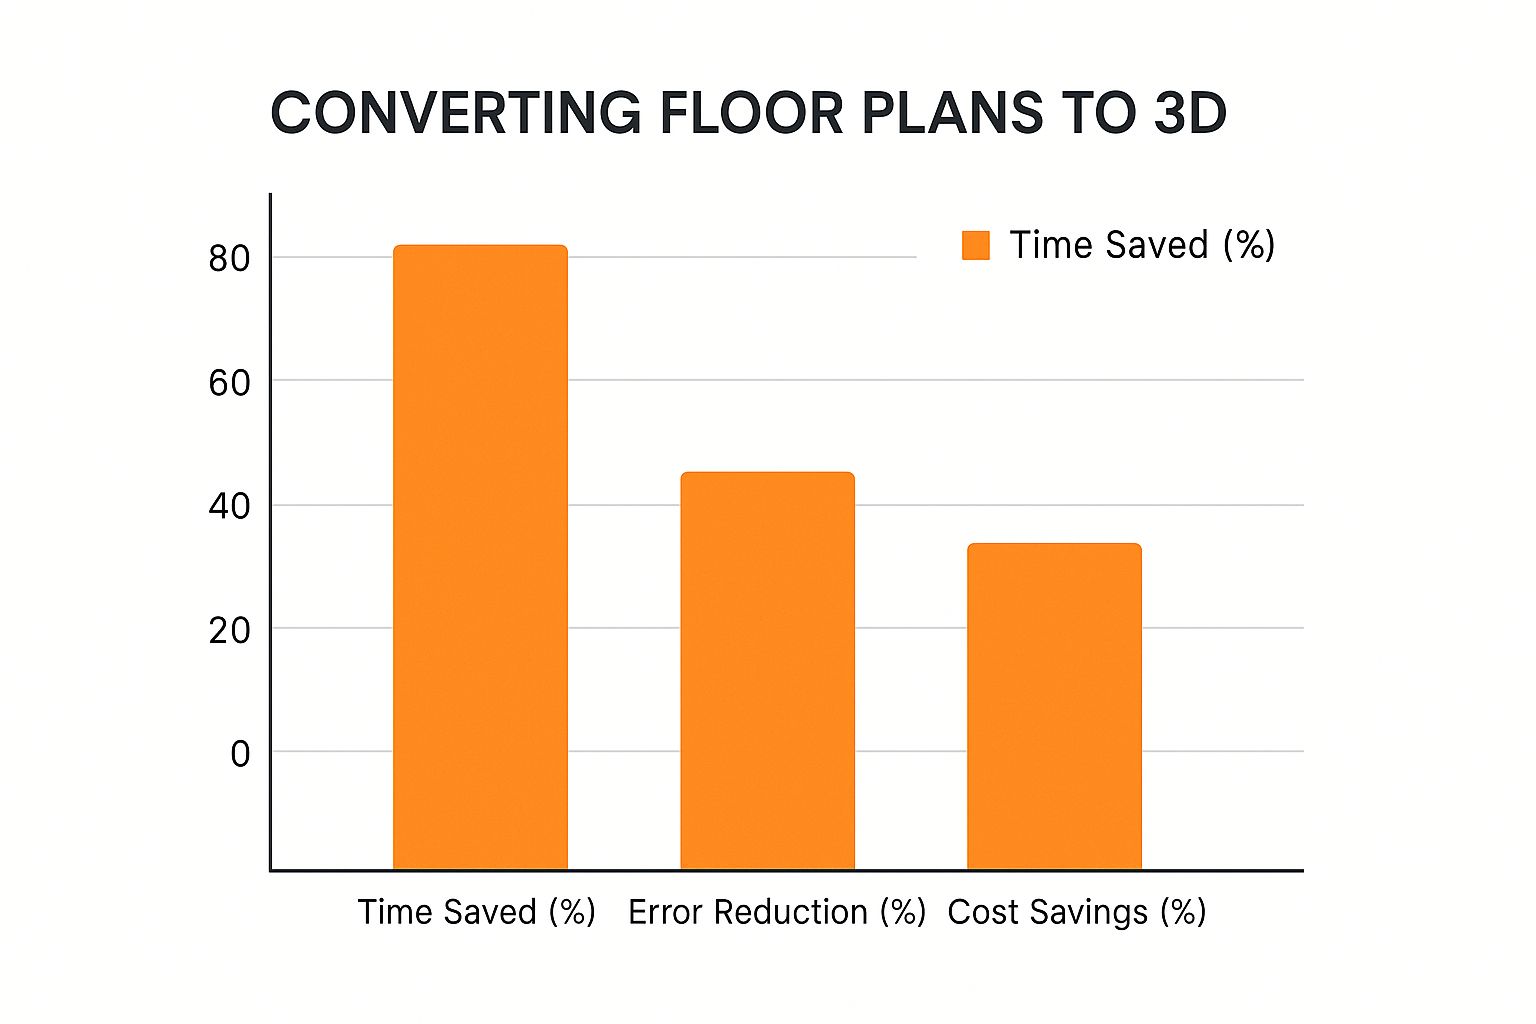
As the infographic shows, a streamlined conversion process saves time, reduces errors, and lowers costs. This reinforces the importance of choosing the right tools and workflows from the beginning.
The Power of Combined Workflows
Many professionals combine multiple tools for optimal results. They might use a simple program for the initial 3D conversion, then import the model into a more powerful platform for rendering and post-production. This balances speed and detail, utilizing each software's strengths. Some are also incorporating AI-powered solutions for tasks like furniture placement.
Beyond the Hype: Evaluating AI in 3D Conversion
While AI offers potential, not all solutions deliver. Some AI tools generate basic 3D layouts from simple floor plans but struggle with complex architectural details. Others provide game-changing features like automatic texture mapping and lighting optimization. Careful evaluation is essential. Successful conversion depends on choosing the right tool for the job, ensuring an efficient, cost-effective process with high-quality results.
From Flat to Fantastic: Your Floor Plan to 3D Roadmap

Turning a 2D floor plan into an engaging 3D model is a process. This roadmap will guide you through each step, from initial blueprint preparation to addressing potential issues. Whether you have precise CAD files or a simple sketch, understanding this journey is essential. For a more detailed look, check out our guide on rendering from a floor plan .
Preparing Your Floor Plan
The first step involves prepping your floor plan. This means making sure your starting point, whether digital or hand-drawn, is as clear and accurate as possible. With digital files, double-check for any missing information or inconsistencies. If you're working with a sketch, redraw it neatly, paying close attention to accurate proportions. This initial groundwork is the foundation for a successful 3D conversion.
Scaling and Proportions: The Foundation of Accuracy
Accurate scaling is paramount. Incorrect scaling results in a distorted 3D model, misrepresenting the actual space. Set a consistent scale, ensuring measurements in your floor plan accurately transfer to the 3D model. This precise approach guarantees your visualization reflects reality. Consistent wall heights are also crucial for maintaining structural integrity in the 3D model.
Walls, Windows, and Doors: Building the Structure
With your floor plan prepared, you can start building the 3D structure. Begin with the walls, raising them to the correct height. Next, add windows and doors based on the floor plan's specifications. Accurate placement and sizing of these elements creates a realistic depiction of the space. This step sets the stage for the detailed work to follow.
Lighting and Materials: Breathing Life Into Your Model
Lighting and materials elevate a basic 3D model into a captivating visual. The placement of natural light dramatically influences the mood and feel of the space. Try various lighting arrangements to achieve the desired ambience. Material mapping, applying textures like wood, tile, or carpet, adds another layer of realism. These details transform your model from a simple structure into a lively and engaging space.
Furniture and Decor: Staging Your Virtual Space
Thoughtful placement of furniture and decor enhances the visualization's impact. Think about traffic flow and functionality when arranging furniture. Adding decorative elements brings personality to the space and allows potential buyers to imagine themselves living there. This staging is similar to how real estate professionals prepare a physical property for viewings.
Troubleshooting Common Challenges
Converting floor plans to 3D can present obstacles. Complex architectural details, unusual spaces, or software constraints can sometimes create difficulties. For instance, curved walls or elaborate ceiling designs require specific modeling techniques. Addressing these challenges methodically leads to a polished, professional result. The 3D rendering market is also experiencing rapid growth. Valued at approximately $5.37 billion in 2025, it's projected to reach around $26.65 billion by 2034. This expansion, driven by technological advances and rising demand across multiple sectors, is highlighted in this research: 3D Rendering Market Research . This growth underscores the increasing significance of 3D visualization across various industries. Staying aware of these trends helps you stay informed and make strategic choices.
Creating Floor Plan to 3D Magic That Looks Professional
Taking a floor plan from 2D to 3D isn't just adding a third dimension; it's about crafting an immersive experience. It's about transforming a simple technical drawing into a captivating visual story. Professionals use specific techniques to elevate a 3D model from ordinary to extraordinary. Let's explore these secrets.
The Power of Light and Shadow
Lighting is crucial in 3D visualization. Just like in photography, strategically placed light can dramatically enhance a scene. Many professionals use a three-point lighting system, a common technique in film and photography. This system uses a key light, a fill light, and a back lightto create depth and realism.Ambient occlusion, a shading technique, adds to the realism by simulating how light interacts with objects, creating soft shadows in corners and crevices.
Material Selection and Texture Mapping
The materials you choose and how you apply them significantly affect the final result. Imagine the difference between a flat gray surface and a richly textured wooden floor. Texture mapping lets you apply realistic images of materials like marble, wood, or fabric onto your 3D model. This process transforms simple shapes into lifelike representations. Different wood grains or fabric weaves can create entirely different looks.
Architectural Details That Make a Difference
Visualization experts focus on small details often overlooked in real life but that add depth to the overall perception of a space. These details might include crown molding proportions, subtle imperfections in a plastered wall, or light reflecting off a countertop. These seemingly minor details add authenticity and elevate the entire visualization. It's like adding the perfect finishing touches to a painting.
Composition: Telling a Story Through Space
Just like a photographer frames a shot, the composition of your 3D rendering is vital. It's not enough to show a room; you want to create a visual narrative that draws the viewer in. This means considering camera angles, object placement, and the overall flow of the space. A wide-angle shot can emphasize a living room's spaciousness, while a close-up can highlight intricate kitchen details. Regional market trends also play a role in the use of 3D visualization. You can explore this further in the Global 3D Floor Plan Service Market . These market forces significantly impact the industry.
By mastering these techniques, you can create 3D visualizations that not only accurately represent a space but also evoke emotion and tell a story. This is what separates professional renderings from the rest and creates truly immersive experiences.
Turning Floor Plan To 3D Mastery Into Business Results

Converting floor plans into 3D models is a valuable skill. It's also a powerful business tool. This section explores how businesses use this technology to get real, measurable results. From real estate to interior design, 3D visualizations change how projects are won, properties are sold, and clients are satisfied.
Real Estate: Reducing Time on the Market
Real estate professionals are seeing big changes from using 3D floor plans. These visuals let potential buyers experience a property in a way traditional photos can't. This immersive experience often leads to fewer showings and a much shorter time on the market. Buyers can explore a property's layout from home, making inquiries more serious.
Developers: Selling Before Construction
Developers are using 3D renderings of unbuilt spaces to pre-sell properties, sometimes at higher prices. By giving a realistic preview, they create excitement and drive sales before building begins. Visualizing the finished product is especially helpful for properties sold off-plan, where showing buyers the final vision is key.
Interior Design: Winning Projects and Minimizing Revisions
3D floor plans offer a key advantage for interior designers. Clients can virtually "walk through" a proposed design, seeing the layout and furniture. This helps designers win projects and avoid costly revisions. Clients can give feedback earlier, reducing miscommunication and ensuring a smoother process. Learn more in our article about virtual home staging software .
Implementing 3D Visualization for a Strong ROI
A good 3D visualization strategy needs a careful approach. This means choosing the right software and presenting it to clients effectively. You also need to fit the technology into your existing business processes. Pricing models are important too, so you get a good return on investment.
Creating Effective Pricing and Presentation Strategies
A pricing structure that reflects your value is essential for success. You could offer different price levels based on how complex the 3D model is. Or you could offer package deals with virtual tours. By explaining the value to clients, you can charge higher prices and lead your industry.
Client presentations are essential for showing off 3D visuals. High-quality renderings and interactive virtual tours can impress clients. Focusing on the emotional impact of 3D models can turn potential buyers into excited investors.
To help illustrate the potential return on investment of 3D floor plans, let's take a look at the following table:
| Industry | Key Benefits | Implementation Cost | Average ROI | Case Study Results |
|---|---|---|---|---|
| Real Estate | Reduced time on market, increased buyer interest | $500 - $2,000 per property | 10-20% | 15% reduction in time on market, 25% increase in inquiries |
| Architecture | Improved client communication, reduced design errors | $1,000 - $5,000 per project | 15-30% | 20% reduction in design revisions, 10% increase in project win rate |
| Interior Design | Enhanced client visualization, increased project upsells | $500 - $2,000 per project | 20-40% | 30% increase in project upsells, 15% reduction in client meetings |
| Construction | Better project planning, reduced construction errors | $2,000 - $10,000 per project | 25-50% | 10% reduction in construction errors, 5% reduction in project timeline |
As you can see, the implementation costs vary, but the potential ROI is significant across various industries. By carefully considering the key benefits and applying the technology strategically, businesses can see substantial returns.
By focusing on these key elements, businesses can use 3D floor plan conversion to improve profits and gain an edge. This technology isn't just about making pretty pictures; it's about changing how we design, market, and sell spaces.
Next-Gen Floor Plan to 3D: Tomorrow's Visualization Today
The world of architectural visualization is constantly changing. What was once groundbreaking quickly becomes the norm. This continuous drive for faster, better, and more immersive visualizations fuels the development of new floor plan to 3D conversion technology.
The AI Revolution: From Sketches to Stunning 3D
Artificial intelligence (AI) is changing how we approach 3D conversions. Imagine quickly sketching a floor plan and, with AI, transforming it into a detailed 3D model in mere seconds. This is the potential of neural networks. These algorithms can analyze 2D images and understand their 3D structure, drastically reducing manual modeling time.
Deep learning systems are pushing the boundaries even further. These systems can learn stylistic preferences and automatically furnish and decorate a space based on your input. For instance, if you specify "mid-century modern," the AI can fill the 3D model with period-appropriate furniture, lighting, and decor.
Real-Time Rendering: Instant Design Exploration
Real-time rendering engines are another major advancement. These engines enable on-the-fly changes during client presentations. Picture changing wall colors, swapping furniture, or even adjusting the entire layout instantly, right in front of the client.
This interactive approach offers incredible flexibility. Clients can fully explore design alternatives in real-time. This direct feedback fosters collaboration and ensures the final design truly reflects everyone's vision.
VR and AR: Stepping Inside the Design
The integration of virtual reality (VR) and augmented reality (AR) creates genuinely immersive experiences. Clients can now "walk through" a property, move furniture around, and experience various lighting schemes from anywhere globally.
This deep immersion enables informed decisions long before construction even starts. For example, a buyer in London could virtually explore a Dubai property under construction, making design choices without traveling. This connection between visualization technologies bridges the gap between imagination and reality. It's not just about seeing the space; it's about experiencing it.
This seamless integration of visualization technologies bridges the gap between imagination and reality. It creates a powerful connection between clients and the spaces they will inhabit. This technology isn't just about visualizing a space; it's about experiencing it firsthand.
Transform your property visualizations and optimize your workflow with Pedra , the AI-powered platform designed for real estate professionals. From virtual staging to stunning renders and property videos, Pedra empowers you to create high-quality visual content easily. Explore Pedra and elevate your property marketing today.

Related Posts
Top 7 AI Room Decoration Tools for 2025
Discover the best AI room decoration software for 2025. Our review compares top tools to help you de...
9 Curb Appeal Ideas on a Budget That Actually Work (2025)
Transform your home's exterior with our top curb appeal ideas on a budget. Get easy, high-impact tip...
10 Essential Curb Appeal Improvements for 2025
Discover 10 essential curb appeal improvements to boost property value. This guide for real estate p...